Introduction
I'm going to tell you something that's funny. As you know, you could install required prerequisites with Click Once. Framework, Windows Installer or SQL Server Express 2008. But, Visual Studio 2010 does not support restoring DB over SQL Server 2005 or 2008.
You could not find a complete reference guide about this issue on internet. There are many more articles regarding Click Once, Bootstrapper Manifest Generator or Setup Project. Here we go, I tell you step by step every part of this project in a single solution.
You will find the download link of this project at the top of the page. You can open it with VS 2010 to analyze the project. Setup.rar contains sample Database, Bootstrapper Manifest Generator setup and source code of this project.
OK. This is our roadmap:
- Backup SQL Database
- Create Class Library for connect to DB
- Create MSI Package that uses previously created Class Library
- Using Bootstrapper for prerequisites of VS 2010
- And distribution with Click Once
Backup SQL Database
- Open SQL Server Management Studio. Right click on Database and select Tasks - Back Up
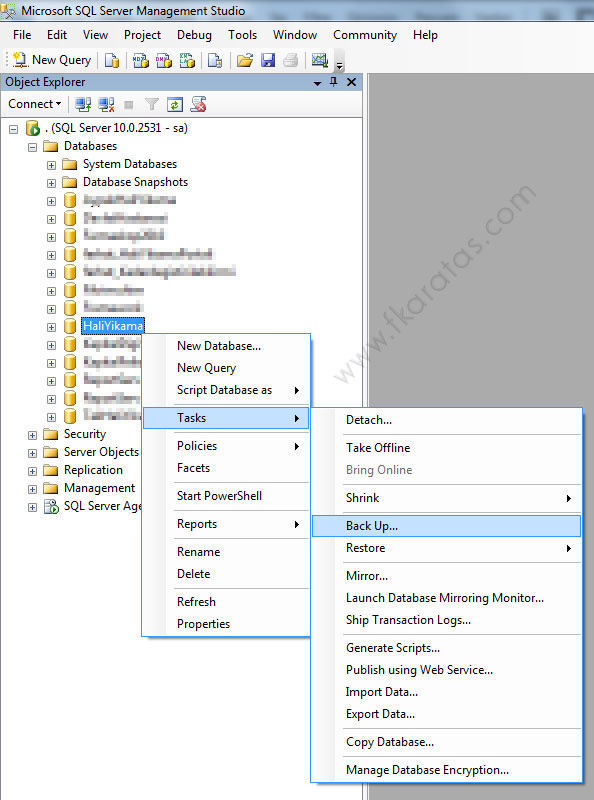
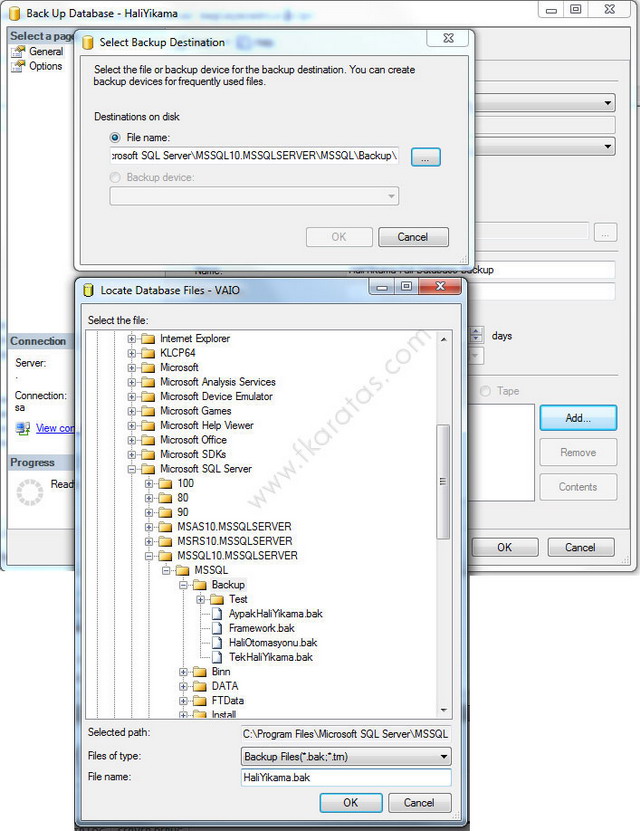
- In opened window, select Add - ... (three dots) and point backup directory. Write database name at File Name section. Example: HaliYikama.bak.
Attention
I want to make a reminder for you. You will encounter a problem when you restore your database if you named it differently than the original database name. Please name your backup file as your database name.
Normally, you could choose any name for backup file (example: contains datetime) Because, you restore it on the same hard drive and location. But, in this project, remote machine location may be different than your backup location.
Bonus of the Day
These sections are not related to this project. I want to give you a Tip'n Trick!
What if you restore your DB to another location than backup file's original location?
Open SQL Query Analyzer and run this command:
restore FILELISTONLY from disk =
'C:\Program Files\Microsoft SQL Server\MSSQL10.MSSQLSERVER\MSSQL\
Backup\VeritabaniBackup.bak'
It gives you
LogicalName of database in the first column. And replace your LogicalName with bold section in the below statement:restore database Veritabanim from disk = 'C:\Program Files\Microsoft SQL Server\ MSSQL10.MSSQLSERVER\MSSQL\Backup\HaliOtomasyonu.bak' with move 'LogicalName' to 'C:\Program Files\ Microsoft SQL Server\MSSQL10.MSSQLSERVER\MSSQL\Backup\Test\Veritabanim.mdf', move 'LogicalName_log' to 'C:\Program Files\ Microsoft SQL Server\MSSQL10.MSSQLSERVER\MSSQL\Backup\Test\Veritabanim_log.ldf'
Create Class Library for Connect to DB
This project aims to connect to DB and restore it.
- Firstly, we should an empty solution for all projects. Open Visual Studio 2010, select New Project. From left side, select Other Project Types - Visual Studio Solutions. Write ClickOnceSQL at Name section.

- Now, we are creating Class Library. Right click on the solution that we just created and select Add - New Project.
 In opened window, select Visual C# - Class Library and name it as
CreatingDB.
- Delete Class1.cs file that is automatically created by the project. And add installer class like this: Right click on project, select Add - New Item. Afterwards, select Visual C# Items - Installer Class, and name itInstaller1.cs. Finally press Add button to complete this section.

- Click to "click here to switch to code view" statement to go codebehind.
OK. Now, I want to tell something about SMO object.The
Microsoft.SqlServer.Management.Smonamespace contains classes that represent the core SQL Server Database Engine objects. These include instances, databases, tables, stored procedures, and views.
Most of the classes
Microsoft.SqlServer.Management.Smo namespace resides in theMicrosoft.SqlServer.Smo.dll and Microsoft.SqlServer.SmoExtended.dll files. Additionally, some of the enumeration classes are in the Microsoft.SqlServer.SqlEnum.dll and Microsoft.SqlServer.SmoEnum.dll assembly files. You will have to import all four files to access all of the classes in the Microsoft.SqlServer.Management.Smonamespace.
By using the
Microsoft.SqlServer.Management.Smo namespace, you can do the following:- Connect to an instance of the SQL Server Database Engine.
- View and modify instance settings and configuration options.
- View and modify database objects.
- Perform DDL (data definition language) tasks on an instance of the SQL Server Database Engine.
- Script databases dependencies.
- Perform database maintenance tasks, such as backup and restore operations.
- Transfer database schemas and data.
Add these assemblies to your project as reference. You could find these objects at C:\Program Files\Microsoft SQL Server\100\SDK\Assemblies location.
Microsoft.SqlServer.ConnectionInfoMicrosoft.SqlServer.Management.Sdk.SfcMicrosoft.SqlServer.SmoMicrosoft.SqlServer.SmoExtended
In addition, you should add
System.Windows.Forms as reference (in the .NET section).
Here we go:
using System.Data.SqlClient;
using System.IO;
using System.Security.AccessControl;
using System.Windows.Forms;
using Microsoft.SqlServer.Management.Common;
using Microsoft.SqlServer.Management.Smo;

namespace CreatingDB
{
[RunInstaller(true)]
public partial class Installer1 : System.Configuration.Install.Installer
{
public Installer1()
{
InitializeComponent();
}

public void RestoreDatabase(String databaseName, String filePath, String serverName,
    String userName, String password, String dataFilePath, String logFilePath)
{
// Create Restore instance
Restore sqlRestore = new Restore();

// Point to database
BackupDeviceItem deviceItem = new BackupDeviceItem(filePath, DeviceType.File);
sqlRestore.Devices.Add(deviceItem);
sqlRestore.Database = databaseName;

// Connect to DB Server
ServerConnection connection;

if (userName == "") // for Windows Authentication
{
SqlConnection sqlCon = new SqlConnection(@"Data Source=" + serverName + @";
Integrated Security=True;");
connection = new ServerConnection(sqlCon);
}
else // for Server Authentication
connection = new ServerConnection(serverName, userName, password);

// Restoring
Server sqlServer = new Server(connection);
Database db = sqlServer.Databases[databaseName];
sqlRestore.Action = RestoreActionType.Database;
String dataFileLocation = dataFilePath + databaseName + ".mdf";
String logFileLocation = logFilePath + databaseName + "_Log.ldf";
db = sqlServer.Databases[databaseName];
RelocateFile rf = new RelocateFile(databaseName, dataFileLocation);
sqlRestore.RelocateFiles.Add(new RelocateFile(databaseName, dataFileLocation));
sqlRestore.RelocateFiles.Add(new RelocateFile(databaseName + "_log", logFileLocation));
sqlRestore.ReplaceDatabase = true;
sqlRestore.PercentCompleteNotification = 10;

try
{
sqlRestore.SqlRestore(sqlServer);
}
catch (Exception ex)
{
MessageBox.Show(ex.InnerException.ToString());
}

db = sqlServer.Databases[databaseName];
db.SetOnline();
sqlServer.Refresh();
}

public override void Commit(System.Collections.IDictionary savedState)
{
// Required permission
try
{
DirectorySecurity dirSec = Directory.GetAccessControl(Context.Parameters["TargetDir"]);
FileSystemAccessRule fsar = new FileSystemAccessRule
(@"NT AUTHORITY\NETWORK SERVICE"
, FileSystemRights.FullControl
, InheritanceFlags.ContainerInherit | InheritanceFlags.ObjectInherit
, PropagationFlags.None
, AccessControlType.Allow);
dirSec.AddAccessRule(fsar);
Directory.SetAccessControl(Context.Parameters["TargetDir"], dirSec);
}
catch (Exception ex)
{
MessageBox.Show(ex.Message);
}

// Parameters that comes from setup project (CreatingDBSetup)
RestoreDatabase(Context.Parameters["databaseName"].ToString(),
    Context.Parameters["filePath"].ToString(), Context.Parameters
["serverName"].ToString(), Context.Parameters["userName"].ToString(),
    Context.Parameters["password"].ToString(), Context.Parameters
["dataFilePath"].ToString(), Context.Parameters["logFilePath"].ToString());

base.Commit(savedState);
}
}
}
Create MSI Package that Uses Previously Created Class Library
We completed the hard section above. Now, we package it as MSI to distribute it.
Right click on solution (ClickOnceSQL), select Add - New Project. In opened window, select Other Project Types - Setup and Deployment - Visual Studio Installer - Setup Project'. Name it
CreatingDBSetup and click OK to complete it..
You will see File System (
CreatingDBSetup) tab when you newly opened page. If not, select File System Editor icon at top of Solution Explorer.
Right click on Application Folder and select Add - Project Output.
You will see the
CreatingDB and Primary Output already selected. Don't touch that. Click OK to apply settings.
Required dependencies are loaded automatically as you see in the below picture. Now, we should add database backup file. Right click on empty area in panel, select Add - File.

Point to database backup file (HaliYikama.bak).

Next, we create a folder for restored DBs .mdf and .ldf. Right click on Application Folder, select Add - Folder and name it Database. Afterwards, click Database folder, open properties window (F4), and set
AlwaysCreateproperty to True.
Next, it's time to pass parameters to Installer class (Installer1.cs) in the previous project named
CreatingDB. These parameters go to method name public override void Commit section as Context.Parameters. These parameters contains server name, dbname and so on.
OK. When you one click
CreatingDBSetup in Solution Explorer, you will see Custom Actions Editor at top of Solution Explorer. Click on it. You will see Custom Actions (CreatingDBSetup) pane at the left side of page.
As you will see, there are four folders named Install, Commit, Rollback, Uninstall. We repeat these actions below for each folder. Right click on Install folder, select Add Custom Action. Click Application Folder to get in. Select Primary output from
CreatingDB (Active) and click OK to apply settings.
You will see Primary output from
CreatingDB (Active) section under the Install folder. Click once to it and press F4 to view its Properties. There is CustomActionData property in the third row. Write the followingstring:/TargetDir="[TARGETDIR]\" /databaseName="HaliYikama"
/filePath="[TARGETDIR]HaliYikama.bak" /serverName=".\SQLEXPRESS"
/userName="" /password="" /dataFilePath="[TARGETDIR]Database\\"
/logFilePath="[TARGETDIR]Database\\"

OK. Now, the first section is completed. Repeat these steps again for the remaining 3 folders. (Commit, Rollback,Uninstall)
Attention
Installation order of prerequisites is a very important issue for this project. Because, if you install Restore DB setup before installation of SQL Server 2008, you will fail. Therefore, I will tell you some critical configuration at the end of the fourth section below under "Attention" tag.
Using Bootstrapper for Prerequisites of VS 2010
We use BMG for extending Visual Studio 2010 prerequisites section capacity. The Setup program is a generic installer that can be configured to detect and install redistributable components such as Windows Installer (.msi) files and executable programs. The installer is also known as a bootstrapper. It is programmed through a set of XML manifests that specify the metadata to manage the installation of the component. The bootstrapper first detects whether any of the prerequisites are already installed. If prerequisites are not installed, first the bootstrapper shows the license agreements. Second, after the end-user accepts the license agreements, the installation begins for the prerequisites. Otherwise, if all the prerequisites are detected, the bootstrapper just starts the application installer.
You can download BMG from http://code.msdn.microsoft.com/bmg/Release/ProjectReleases.aspx?ReleaseId=1567. Click BMG2008Setup.msi to start download. Install it after download. You can see the program's shortcut on desktop. Open the program. Select File-New-Package Manifest and click OK to close window.

Set Project Name to Restore DB in opened window Also Product Code automatically filled. Don't touch.
Click an icon named Add Install File that stays top left of screen. Select Browse and point to Release version of your MSI package (example: D:\My Projects\Visual Studio 2010\ClickOnceSQL\CreatingDBSetup\Release). Click OK to complete this section.

Write Restore DB to Display Name section. Afterwards, click Build icon that stays as second icon on top of screen. Build process completed in newly opened window.
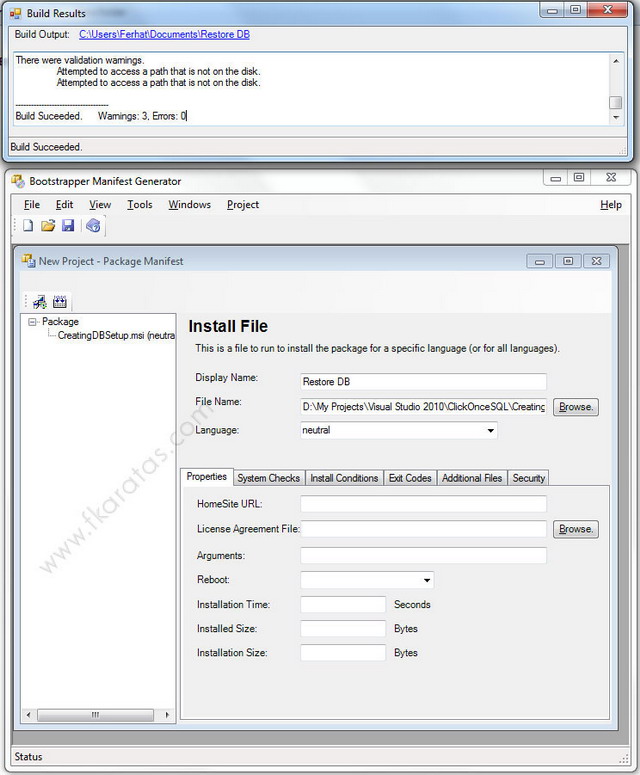
You can see built package location at the top of newly opened window. C:\Users\Ferhat\Documents\Restore DBis my location for this sample project. Open this location, go one level up, and copy entire (Restore DB) folder. Then paste into C:\Program Files (x86)\Microsoft SDKs\Windows\v7.0A\Bootstrapper\Packages folder to let VS 2010 to recognize new prerequisite. Well, we complete Bootstrapper operation. Restart VS 2010 to work with new prerequisite.
Attention
Now, we are in the middle of the most critical configuration phase. Please read carefully and implement it as I said.
The installation order of prerequisites is a very important issue for this deployment project. But also VS 2010 does not support installation order with its user interface. We make it with some XML changes.
Firstly, we should understand the XML form of product.xml. Open SqlExpress2008 folder under C:\Program Files (x86)\Microsoft SDKs\Windows\v7.0A\Bootstrapper\Packages\. You will see product.xml file. Open it and review carefully:
<?xml version="1.0" encoding="utf-8"?>
<!-- SQL Express 2008 VS Bootstrapper : product.xml : Language neutral information -->
<Product xmlns=http://schemas.microsoft.com/developer/2004/01/bootstrapper
 ProductCode="Microsoft.Sql.Server.Express.10.0">
<RelatedProducts>
<EitherProducts>
<DependsOnProduct Code=".NETFramework,Version=v4.0" />
<DependsOnProduct Code="Microsoft.Net.Framework.3.5.SP1" />
</EitherProducts>
<DependsOnProduct Code="Microsoft.Windows.Installer.4.5" />
<IncludesProduct Code="Microsoft.Sql.Server.Express.1.0" />
<IncludesProduct Code="Microsoft.Sql.Server.Express.9.2" />
</RelatedProducts>
<PackageFiles>
<PackageFile Name="SqlExpressChk.exe" />
</PackageFiles>
</Product>
There is
DependsOnProduct node that defines the required installation. Code property points toProductCode which resides in Product node at top of XML file. Example:<Product xmlns=http://schemas.microsoft.com/developer/2004/01/bootstrapper
ProductCode="Microsoft.Sql.Server.Express.10.0">
OK. Open your product.xml (C:\Program Files (x86)\Microsoft SDKs\Windows\v7.0A\Bootstrapper\Packages\Restore DB) and add the following nodes:
<RelatedProducts>
<DependsOnProduct Code="Microsoft.Sql.Server.Express.10.0" />
</RelatedProducts>
</Product>
Finally, the product.xml file should be:
<?xml version="1.0" encoding="utf-8"?>
<Product ProductCode="Restore.DB"
xmlns="http://schemas.microsoft.com/developer/2004/01/bootstrapper">
<PackageFiles CopyAllPackageFiles="false">
<PackageFile Name="creatingdbsetup.msi" Hash="31E40D0C5D7BCA642E412EABF16E4C381EB7ADEB" />
</PackageFiles>
<Commands Reboot="Defer">
<Command PackageFile="creatingdbsetup.msi">
<ExitCodes>
<DefaultExitCode Result="Success" String="Anunexpectedexitcodewasr"
FormatMessageFromSystem="true" />
</ExitCodes>
</Command>
</Commands>
<RelatedProducts>
<DependsOnProduct Code="Microsoft.Sql.Server.Express.10.0" />
</RelatedProducts>
</Product>
Please be careful !
Your installation has failed if your product.xml is not the same as above. If you don't change product.xml as above or leave it as original, your published "Click Once" screen become like this:

As you see Restore DB stays before than SQL Server 2008 Express installation. After product.xml configuration, our ClickOnce publish screen becomes like this:
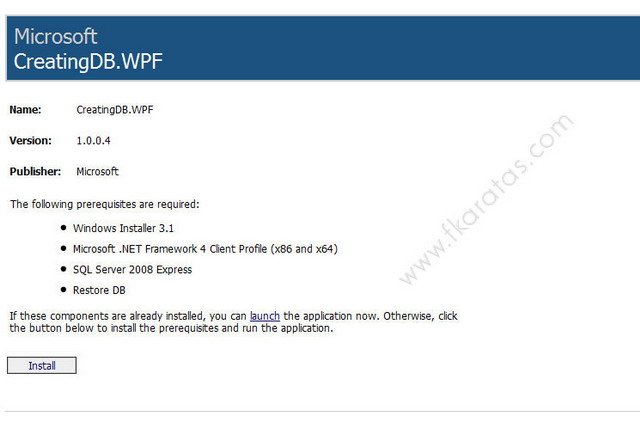
Yeap! This is what we wait for. :)
And Distribution with Click Once
I will mention about ADO.NET Entity Data Model and WPF Windows Application in this section. But these concepts do not belong to this article. Briefly, I want to make a windows application that connects local database with data layer. You may choose Windows Forms rather than WPF, and use LINQ to SQL Classes rather than ADO.NET Entity Framework.
I add new project named
CreatingDB.Data as Class Library to solution. This is my data layer for WPF application. Afterwards, I add ADO.NET Entity Data Model to connect local DB with Windows Authentication.
Now, there just remains one project to add. I add another project named
CreatingDB.WPF as WPF Application to solution. This project uses CreatingDB.Data to connect DB. Thereby I add CreatingDB.Data as reference using Add Reference-Project selection.
Also, I should add
System.Data.Entity namespace with Add Reference - .NET to work with Entity Framework. Finally, I add Application Configuration File (App.config) to WPF project for overridingCreatingDB.Data connection string. And copy CreatingDB.Data App.Config content toCreatingDB.WPF App.Config.
OK. It's time to design the user interface.
Here is my WPF form design section:
<DataGrid AutoGenerateColumns="False" Height="80"
 HorizontalAlignment="Left" Margin="35,70,0,0" Name="dataGrid1"
VerticalAlignment="Top" Width="323" ItemsSource="{Binding}" >

<DataGrid.Columns>
<DataGridTextColumn Header="Adi" Width="135" Binding="{Binding Name}" IsReadOnly="True"/>
<DataGridTextColumn Header="Adresi" Width="135"
 Binding="{Binding Address}" IsReadOnly="True"/>
</DataGrid.Columns>
</DataGrid>
This is codebehind section:
private void button1_Click(object sender, RoutedEventArgs e)
{
try
{
CreatingDB.Data.HaliYikamaEntities context = new Data.HaliYikamaEntities();
dataGrid1.DataContext = context.CustomerSet;
}
catch (Exception ex)
{
MessageBox.Show(ex.Message);
}
}
Right click on WPF project and select "Set as StartUp Project", then compile it. Check it out for errors. If there is no error, you will see records when you click on the button.
Attention
In your development machine SQL Server Enterprise or Developer edition your connection string should be changed because client machine always uses SQL Server Express edition in this "Click Once" project. Look at your connection string at App.config file that resides under WPF project.
Replace Data Source=.\; statement with Data Source=.\SQLEXPRESS;
Finally, your WPF (Windows App) App.config file should be:
<?xml version="1.0" encoding="utf-8"?>
<configuration>
<connectionStrings>
<add name="HaliYikamaEntities" connectionString=
"metadata=res://*/Model1.csdl|res://*/Model1.ssdl|res://*/Model1.msl;
provider=System.Data.SqlClient;provider connection string="Data Source=.\SQLEXPRESS;
Initial Catalog=HaliYikama;Integrated Security=True;
MultipleActiveResultSets=True"" providerName="System.Data.EntityClient" />
</connectionStrings>
</configuration>
Next, we will publish our project. Please reset your Visual Studio to recognize new prerequisite (Restore DB), right click on WPF project. Select Properties, switch to Publish tab, click to Prerequisites button. You will see Restore DB, select it, and also SQL Server 2008 Express. There is another checked box selected by system: Microsoft. .NET Framework 4 Client Profile(x86 and x64) and Windows Installer. Don't touch. As a result, there are 4 prerequisites selected. Click OK to apply settings.

Click Updates button and select "The application should check for updates" check box to inform user when you update your application. Click OK to apply your choice.

Next, click Publish Wizard that stays end of page to publish your project. Select Browse and point your newly created empty directory (example: publish):

Click Next, your question is "How will users install the application" We prefer a website (that provides us easy updatable application):

Click Next, the question is "Will the application be available offline?" We choose "Yes".

Click FINISH to complete publish process. Upload your "publish" folder to your web site via FTP. Now, you can install your published project like this: http://www.fkaratas.com/app/publish.htm.
You will see Install button when you open up the URL. Please click it to let it begin. Also select Run when message box appears.
Here is the installation order. First screen is Microsoft .NET Framework 4 Client Profile (x86 and x64), Click "Accept" to continue. (If you have .NET Framework, you will not see this screen):

My test machine is XP Service Pack 3. Thereby Windows Installer 3.1 installation screens does not appear for me. As you know, it is Click Once deployment concept.
Second screen is SQL Server 2008 Express, please click "Accept" to continue.

Last screen is "Restore DB". Select Install to continue.

Now, downloading is beginning...

Installation is automatically started when downloading finishes. After NET Framework installation is complete, machine prompts you to restart your PC. Please select Yes to continue installing.

After restart SQL Server 2008 Express and Restore DB installation begins.

When all prerequisites are completed, our windows application starts up.
I hope this article will be useful for developers who need it.